It is important to programming Chamberlain garage door opener before installing it for the first time, replacing an old remote, or just syncing everything up after changing the batteries. A properly programmed opener keeps your home safe and gives you full control over who can enter your garage.
This guide covers everything you need to know, from basic programming to troubleshooting and syncing multiple devices. Follow these easy steps to programming Chamberlain garage door opener and enjoy the convenience and security it brings. Whether you’re a new user or updating an old system, this guide will have you covered in simple terms.
Understanding the Parts of Your Chamberlain Opener
It is helpful to know what the main parts of your garage door opener do before you start. Knowing these parts will help you fix problems later and make programming Chamberlain Opener easier.
- The Motor Unit: This is the main part of your garage door opener. It is put on the ceiling. It contains the motor and electronics, along with the control panel.
- Remote Controls:Chamberlain remotes typically come with one or more buttons to control the garage door. These remotes will need to be programmed to work with your opener.
- The Wall-Mounted Control: Many Chamberlain openers come with a wall-mounted control that lets you open and close the door from inside the garage.
- Safety Sensors: Located at the base of the garage door tracks, these sensors prevent the door from closing if something is in its path.
- The Learn Button: This button is key to programming Chamberlain Opener . It’s often on the back or side of the motor unit and is used to pair remotes and vehicles with the opener.
Finding the Learn Button Chamberlain Opener
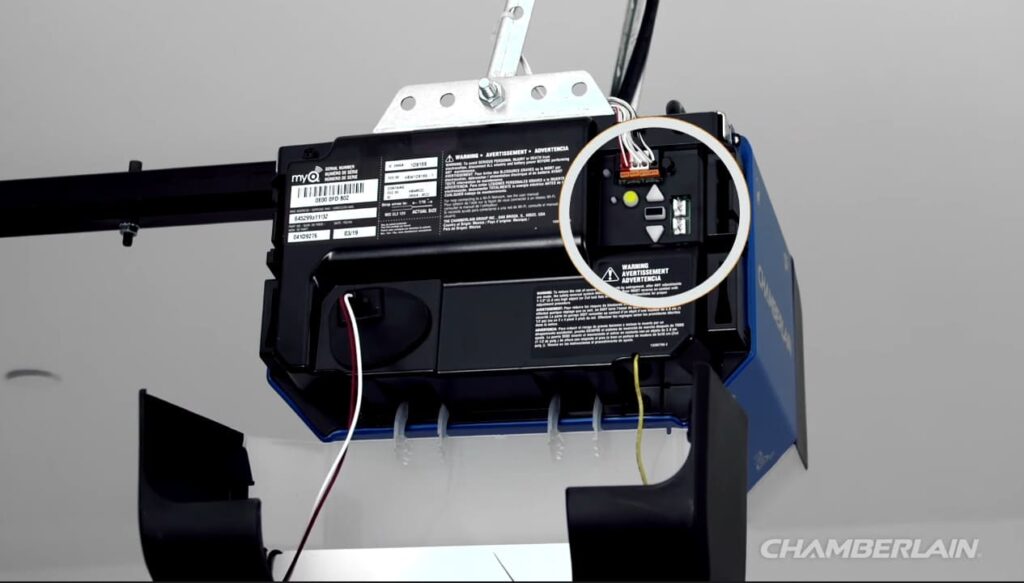
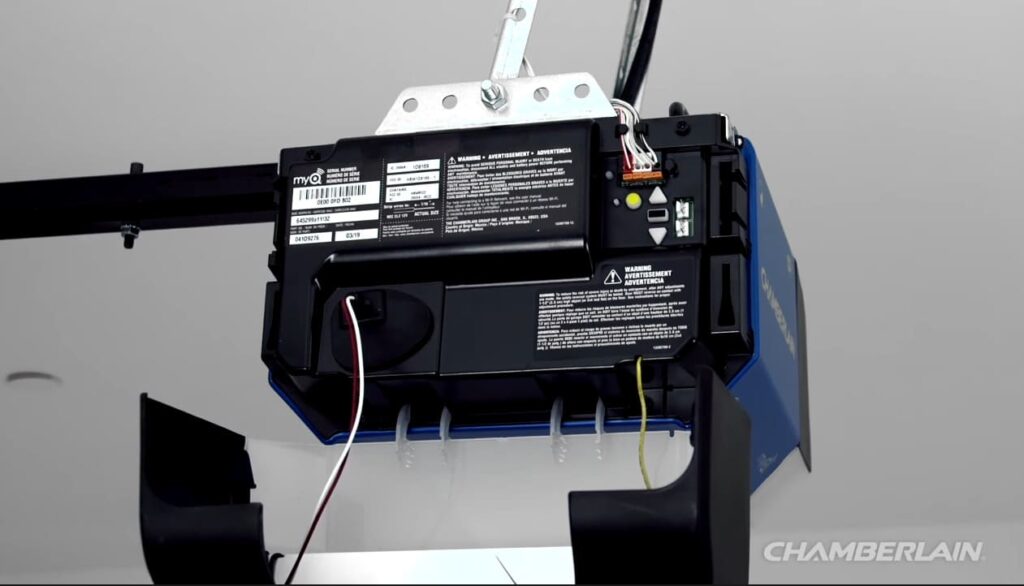
To locate the colored learn or program button on your LiftMaster, Chamberlain, or Sears garage door opener, first locate the antenna wire hanging down from your unit. The control panel will be directly above this wire. Simply open up the light cover if it has one, and then, getting up at eye level, you can look and find the program button on this unit. We see it here on the right side near the group of wires. This is an yellow learn button. The color of the learn button will not only allow you to program the remote controls, but it will also tell you which remote control to order for your system.
Chamberlain Learn Button Colors Explained
Essential for choosing compatible remote controls and keypads, the color of the Learn button on your Chamberlain garage door opener reveals the particular technology and frequency it employs. The color codes break out here:
- Yellow : runs on 310,315, or 390 MHz using Security+ 2.0 technologies. Designed and produced starting in 2011.
- Purple: Employs Security+ technology at 315 MHz. Manufactured since 2005.
- Red/Orange: Uses Security+ 390 MHz Rolling Code technology. Manufactured between 1997 and 2005.
- Green: Operates with Billion Code technology at 390 MHz. Manufactured from 1993 to 1997.
Identifying the color of your opener’s Learn button will help you determine the appropriate accessories and programming methods for your system.
How to Programming Chamberlain Garage Door Opener?
Programming Chamberlain Remote Control with the Door Control
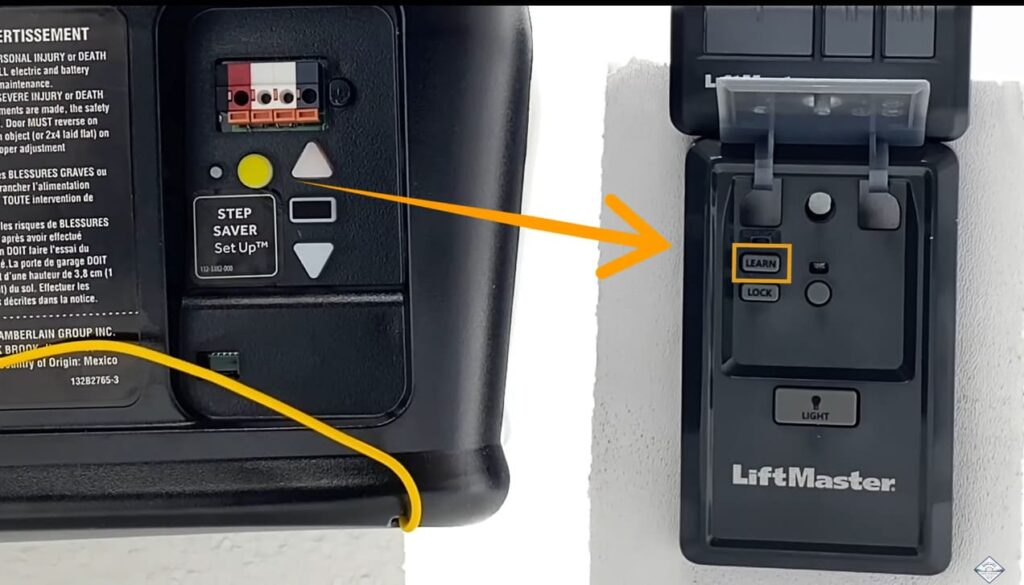
Many Chamberlain openers feature a door control panel including a Learn button. Should this be part of your configuration, use these guidelines:
- Press the Learn Button on Your Door Control
Often under a removable cover, check the wall-mounted door control for a “Learn” button. Activate pairing mode by pressing this button. - Activate Pairing Mode on Your Remote
Assign your garage door opener a button on your remote. Press it to observe successful programming—the garage lights should flash or click. - Test the Remote Control
To be sure everything is working, open and close your garage door using the programmed button.
Programming a Remote Control Directly with the Garage Door Opener
If your garage opener doesn’t have a door control panel, use the Learn button on the motorhead itself.
- Locate the Learn Button on the Garage Door Opener
You can find the Learn button on the motorhead of the opener. To get into programming mode, press and let go of the button. - Check Compatibility with the LED Light
The LED color next to the Learn button shows compatibility. After 1993, Chamberlain remotes work with most openers; if you are not sure, consult the hand manual for your model. - Clear Memory if Needed
Should the opener have prior remote pairing, clear its memory by depressing the Learn button until the LED light turns off. - Program the Remote
Press Learn, then, choose and press a button on your remote within thirty seconds. Look for the garage lights flashing or hear a double-click to verify pairing. - Testing the Remote
Press the allocated button to test the remote once it has been programmed. Should a problem arise, make sure nothing blocks the garage door and, should necessary, retry programming.
Programming Chamberlain Keypad
Chamberlain also offers keypads, which allow access with a code. Here’s how to set one up:
- Find the Learn Button
Locate the Learn button on the garage door opener’s motorhead. It’s usually near the antenna wire. - Identify Your Opener ID
Based on the LED color, find your opener ID. For example, a red/orange LED typically indicates ID 2, while yellow often means ID 8. Check your manual for exact details. - Prepare the Keypad for Programming Chamberlain
Press and hold the * and # keys until the keypad lights stop flashing. - Set Your PIN and ID
Enter a four-digit PIN of your choice, followed by the # key. Then input your opener’s ID and press # again to complete the setup. - Connect the Keypad with the Opener
Press the “Learn” button on your opener and then enter your PIN followed by 0 on the keypad. If successful, your keypad should control the garage door. - Testing and Changing Your PIN
Test your keypad by entering the PIN and pressing 0. To change your PIN, input your current PIN, press *, enter the new one, and press * again.
Tips for Extending the Lifespan of Your Chamberlain Garage Door Opener
Regular maintenance of your Chamberlain opener will help it to work better. Do not overlook these crucial pointers:
- Routine Checks and Cleaning: Tightening bolts and greasily moving parts every so often helps parts from wearing out stay intact. Keep the opener neat as well so that other elements, including dust, will not stop it from running.
- Sensor Testing: Periodically check the sensors to ensure they’re working correctly. Faulty sensors can compromise safety.
- Annual Inspections: Hiring a professional annually can help spot potential issues early, preventing costly repairs.
When to Hire a Professional
You could run across programming problems even following these guidelines. Should troubleshooting fail or you have questions about the installation, professional advice could be valuable. A qualified technician can guarantee correct configuration and provide solutions specifically designed for your garage door system.
Comparing Chamberlain with Other Garage Door Opener Brands
See how Chamberlain stacks against other top brands to make a better informed choice:
- Genie Garage Door Openers: Innovative features of Genie Garage Door Openers—known for their security—often include Intellicode technology, same as Chamberlain’s Security+ uses.
- LiftMaster: Under the same parent company as Chamberlain, Lift Master provides comparable quality and features including remote control compatibility with MyQ technology.
Final Thoughts
Programming Chamberlain garage door opener doesn’t have to be complex. With these step-by-step instructions, you can easily set up a remote control, keypad, or both. Whether for increased security or convenience, having a programmed opener enhances your garage’s functionality, making entry and exit effortless. Remember, regular maintenance and professional assistance when needed can extend your opener’s lifespan and ensure it continues to operate smoothly for years to come.

